One of the things that surprises me about the assisted living market is how few assisted living facilities utilize video to help market their facilities and services. With the explosive growth and popularity of social media and video-sharing websites like youtube and vimeo, video should be on the top of the priority list for any facility in terms of where their marketing minutes and dollars are going.
Sites like Youtube are a valuable source of traffic that is not directly tied to google search, which should be of interest to anyone wishing to gain more online traffic. As anyone with a web-presence knows, getting a site noticed by google is not an easy task, and it seems to get harder every year.
Building a presence on youtube can be a great way to spread the word about your assisted living facility in an engaging, and interesting way. In addition, videos you create for your facility can be easily embedded into your facility’s website (if you have one), which helps bolster your website’s content – something that google seems to favor more nowadays – good, unique content…and an original, well-done video qualifies as exactly that – good content!
In terms of cost – finding someone to do a good video for your facility might be challenging and expensive. My recommendation is to spend that money on some decent equipment, and learn to do it yourself. That’s exactly what I have done, from the comfort of my own home! I’ve learned how to create decent (I think) videos, and it has since essentially paid for the equipment, and the things I have learned are becoming invaluable. For about $1500, and some dedicated time to learn, and experiment – you can become a master at assisted living videography! We’ve all probably used Youtube before, and one of the things I think I can safely say is that there is a wide range of videos out there in terms of quality – and nothing can turn off a viewer quicker than a grainy video with poor sound, and outdated, or “lame” graphics or fonts. That’s why spending the time to create a High-Definition video using the proper equipment and software can mean the difference between a move-in to your facility, or a family steering away from your facility to another that has a better, more professional presentation of their video. Quality is of utmost importance.
I’ll try to move into the important stuff of this article now – what equipment and software I use, and what you can expect in terms of learning curves, and expense.
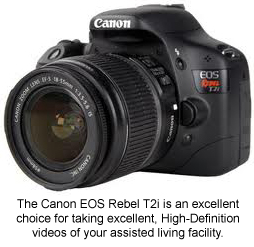
My video learning journey began about a year ago when I purchased a Canon EOS Rebel T2i/550D DSLR camera. At the time, I think the camera was about $800, but now, since the T3i has come out, the price has dropped several hundred. This camera is, without a doubt, awesome. It looks like a pretty regular camera, but it has the ability to take high-definition videos that are outstanding in quality and resolution. The camera comes with a good ‘kit lens’ – a Canon Zoom Lens EF-S 18-55m 58mm – which is very adequate for video and photos. I have several other lenses that I have purchased as well, but I have found that this kit lens does everything needed to take great videos – and offers sufficient zoom capability.
There is a bit of learning to do with this camera – as it is not a point and shoot. The manual is pretty good, and can get you started pretty quickly – but the cool things to learn, like aperture settings (which can keep the subject in focus, and the background a bit blurry, giving the scene more depth), white-balancing, shutter speeds, etc. take some dedicated reading and experimenting time.
An excellent, and in-depth book that I have that is dedicated to the T2i is David Busch’s Canon EOS Rebel T2i/550D Guide to Digital SLR Photography which you can find here. This is one of the best books I have found on how to take excellent photos and videos using the Canon T2i.
I also recommend picking up a basic tripod – they vary widely in price, but you don’t need a top of the line one. You can spend well under $100 for a very good tripod, and most big-box electronics stores carry them, and you can also get them in many places online. A very good one that will accommodate a fluid tripod head (discussed in a moment) is a Manfrotto 055XProB, which, is a little more expensive, but worth it if you can swing it. This one’s about $150.
Audio is one area that can really make a video seem professional, or amateur. Poor audio can be a quick turnoff, no matter how good the video quality is, which is why I recommend picking up a good microphone for your camera. I use the Rode VideoMic – Camera Mounted Shotgun Microphone, which you can pick up for about $150. This microphone can be mounted easily on top of the Canon T2i, or you can easily get a table-top microphone stand, or a full-size stand if you wish. I use a pretty basic Table Top Microphone Stand which has been perfect for my needs. The cord on the Rode microphone is very long, which helps with placing the microphone in a good spot for interviews or speaking segments in your video. The Rode Mic does an excellent job of minimizing external noise like wind, and produces very good, rich sound. I have been extremely happy with it.
For external (and internal) shots of your assisted living facility, still photos or video can work, but there are a few ways you can make these much more interesting. One of the techniques I am learning is using a ‘slider’ or ‘dolly’ which you can easily mount your camera on to take ‘motion’ shots of your facility. I use a Konova Slider (which you can get for about $330 new, and I am sure you can find them for much less used). I then purchased a Fancier FT-717 AH fluid tripod head to mount on the slider, which, in turn, I mount the camera on. To me, motion shots are much more engaging and interesting to the viewer, and really add a high degree of professionalism and quality to your videos. I created the video below that shows how to use the slider, and I offer several examples of the slider in use at various assisted living facilities that I have visited.
For video editing, I purchased Vegas Studio HD Platinum 11, which, I found was fairly easy to learn, and to me, is a very intuitive program for putting together your videos, and adding music and graphics to them. There are numerous tutorials on how to use this software on Youtube, and elsewhere, so if you get stuck, just do a search and you will almost certainly find it. I learned how to use this software within a week or so. I think the most difficult part of using software such as this is the final, ‘rendering’ process – which basically translates your raw video into a file that can be used for Vimeo, youtube, or whatever application you may need it for. However, again, there are good tutorials on this all over the internet…so just take a look around and I am sure you can figure it out quickly.
I also like to incorporate, where appropriate, good graphics and transitions into my videos. I found some excellent backgrounds, graphics, and transitions that can be purchased from Digital Juice. I like the Editor’s Toolkit Pro Singles, and, at the time of this writing, you can get 4 of them for under $100, which, given the excellent quality of these graphics, is a great deal. There are good instructions and tutorials on the Digital Juice Site on how to incorporate these graphics into your videos. The learning curve on this part was not much – I was able to add transitions and backgrounds to my videos within an hour or so after receiving the discs in the mail.
The only other software I use is Adobe Photoshop – which is another purchase, but there are many good, free or inexpensive photo editing programs out there – any of which will most likely be sufficient for your video needs (If you incorporate still photos into your videos, as in a slideshow).
Lastly, there are a number of good sites that allow you to use royalty-free music under a creative commons license (meaning you can use it for your videos as long as you give the author, owner credit – make sure to read the terms of service on these sites very carefully, and see if they allow use of their music for commercial use.). The site I like to use has a wonderful selection of music – www.incompetech.com with music files that can be easily downloaded and imported into most video editing software programs.
From there, it is a matter of getting your video online via Youtube, or Vimeo – and then getting it out there wherever you can by embedding it into your website – including it into your newsfeed on Facebook and Twitter, and anywhere else. Hopefully, if you put out a good product, others will “like” your video, and embed it or talk about it on their blogs, websites, or social networking pages.
The assisted living niche, or senior care industry is becoming more and more competitive every year, and to me, one of the best, and most accessible ways an assisted living facility can set itself apart from the pack is by producing a high-quality, interesting and engaging video about their facility, long-term care or caregiving, their services, amenities, and whatever else they have to offer.
Here is my first assisted living video/interview that I did earlier this year that uses the equipment and techniques described above. My modest goal each time I do a new video, tutorial, or interview is to try to learn one thing new, and get a little better each time! I’ve learned a lot in the past year!
It has been said that a picture is worth 1000 words….and I believe a quality video goes far beyond that. I wish everyone the best of luck in their efforts!


www.SmartSound.com has a cool set of features for adding high-impact royalty free music to your project. They are the only ones with this patented process that makes the music the exact length that you want. Most of the music also comes with each instrument on a separate track so you can arrange the sound to fit your project. It works great, and saves a bunch of time.
Awesome advice…will try soon. Thanks!
Thanks Maria.